This is a quilt I made for a crazy quilt course I had given a couple of years ago. I love using this each year on my coffee table for Valentine's day.
I wanted to share some photos of the stitching on this quilt. When I gave these classes, a number of the people took the class saying they did not like crazy quilts but wanted to take my class again anyway. I gave them patterns to choose from showing them crazy quilting in a traditional way but also some with a bit more modern twist. A reason some don't like crazy quilting is they don't like the Victorian style stitching. I do love both ways but this is a way to bring a crazy quilt more up to our times.
Once the blocks were sewn, I first stitched them on each seam using my embroidery stitches from my sewing machine. Using the same thread for each seam while changing the stitch gives you a subtle effect. One each block is decorated with stitches, sew the blocks together. I used a piece of vintage lace for around the edge by the border.
Sew the backing to the quilt and as a finishing touch, I sewed the two seams running vertically and horizontally where the blocks were sewn together with an embroidery stitch in the same color thread again. This is a simple and effective way to stitch up a crazy quilt.
Wednesday, January 30, 2008
Monday, January 28, 2008
Lace pinkeep, thread bag fob and samplers
As I had mentioned in my last post, I thought I would finish the band sampler for my lace pinkeep over the weekend and here is the results...
I decided that it needed to finish with a small row on the very top so I ended up adding one more row than I had planned. I am happy with this side of the pinkeep and now have to pick out the three lace patterns to use. I am wondering how far my lace friends are on theirs?
I need to spend a little time each month working on this chart called Silent Sampler. I was doing this as a SAL with a couple of other ladies. We decided to put it aside for the holidays. I wanted to pick it back up last week but thought better of it when I was working on the lace pinkeep as well as some surprises for a Valentine's Day swap. Now that these items are done, I will work on this sampler this week.
One of the fobs I made while working on my mother's fob I shared with you earlier is this little fob for my tapestry thread bag. I have the DMC for this sampler all together in this cute little bag and thought adding a fob would be fun. The charm on the end of this one is a spool of thread.
I did not get very far with my Silent Sampler last year but hope to make some leaps forward in the coming week. I will work on this one week out of each month so I can skip back to my Beatrix Potter sampler also.
Isn't this the sweetest verse? I found it online last year.
How various her employments whom the world
Calls idle and who justly in return
Esteems that busy world an idler too
Friends, books, her needle and perhaps her pen,
Delightful industry enjoyed at home
Can she want occupation who has these?
- 1822 Sampler Verse
Thursday, January 24, 2008
My lace pinkeep progress
I am very busy working on two quilt projects at the same time so have not been able to share much with you lately. I will try and share some photos of the quilts I am sewing in the coming week. I work in the evenings on my lace pinkeep project. Here is my progress so far for the stitched side:
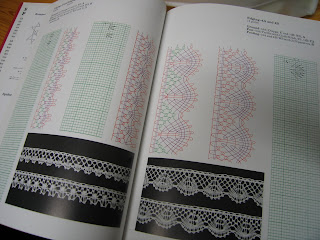
I will be stitching another two rows after this one. I am also going through a book of lace bands to see if there are some in here that I want to use. I would like to make three bands of lace to give the same effect as the stitched rows on the other side. You can get lost going through these lace books. Time flies by and all I have done is sit and look at all the pretty patterns.
I have been helping some of the ladies in my quilt group with their center blocks for the medallion quilts. Today one of the ladies came over to have me help her pick out the fabrics and cut the block. There are some exciting blocks happening! I cannot wait until our next quilt evening when we will show the results so far.
Friday, January 18, 2008
Blogging friends
Today I went to meet a blogging friend that lives here in the same city as I do. Carolien started blogging back in November but had been reading and commenting on my blog for a while before that. We contacted each other to get together. I drove to her house this morning. She lives in a beautiful old house which is connected to the church. From the moment she opened her front door to greet me, she was warm and welcoming. I felt like we already knew each other a good bit through our blogs. She talks about her cat Lea on the blog. She is a friendly little cat who quickly decided to sleep through us chatting away over tea. I was invited to stay for lunch and met her sweet daughter Fleur who was home for her lunch hour.
The house Carolien and her family live in dates back to the 1920s and is a big beautiful home. I enjoyed her showing me the house and then she showed me through the passageway to the church. Well, I had no idea that we had such a beautiful church here.
She keeps chickens in her garden and look at the wonderful gift she had waiting for me. What a treat! As readers to my other blog know, I love being up at our cottage and going for fresh produce and eggs at the local farms. Isn't this amazing? I have fresh eggs from her own chickens. She lined the bowl with a quilt fabric and gave me three other fat quarters. Well, to say the least, I felt spoiled.
After lunch she made us another cup of tea and while talking, she gave me some items that had belonged to her mother who has passed many years ago. To a lacemaker, old items are very precious. She gave me a book with lace patterns, a box full of bobbins and a box full of old wooden spools with lace thread and various other items. I felt so touched that she wanted to give me these items. They will find a special place here.
Thank you so much Carolien for a wonderful day and I enjoyed meeting André and Fleur!
Thursday, January 17, 2008
Winter blues and loving lace...
Not the actual blues but the color blue for a winter scissor fob for my mother. I am doing so many involved projects right now and needed to do something I could finish quickly. I needed a 'finish fix'.
Aren't the snowman and snowflake charms adorable. She collects snowmen.
I finally found long eye pins to create a fob for her with the beads I had purchased. I love the long blue bead between the others but it would not fit on the eye pins I already had. The silver beads look like snowballs, don't they?
I am working on a short fob to attach to my tapestry bag I use for my stitching threads and will share a photo of it later.
As you know, I love lace. Here is a photo of just a few of my lace bobbins from all over the world.
I get together once a month with two friends who also make bobbin lace. We are starting a new project to make a pinkeep using lace we will make ourselves. The pinkeep will be double~sided. We are starting with the side which will have some stitching. We all three decided on various patterns.
Dentelles et Rubans by Anne Van Damme is the most wonderful book. If you love lace, you will love this book full of lace patterns to cross stitch. I am using a pattern from this book for one side of my pinkeep.
I am using a portion of one of the samplers. I will stitch about 7 of the decorative rows to give the effect of a Dutch band (row) sampler. I will show you more as I progress...
Tuesday, January 15, 2008
Patchwork pinkeeps tutorial
Many of you are like me in that you enjoy doing various types of needlework. One of the fun things we can do is to combine various types of needlework together. I wanted to share this idea of making a pinkeep, which most of us are used to as a way to finish cross stitching, by adapting it to use patchwork.
For this example, I took it a step further and used a crazy quilt block so I was able to combine some embroidery too.
Take a piece of muslin and draw a crazy quilt block on the fabric with pencil. These are your sewing lines and if you enlarge this photo, you should be able to see my own lines. Be sure to make the outside lines of this block to aide you when doing your decorative stitching. Since these stitches and some beads are bulky, you will have to be sure you do not continue past these lines to make sewing your pinkeep together easier. These lines are the exact size the pinkeep will become and are shown with bold pencil marks where I would be making decorative stitching on a sewn seam.
If you feel uncomfortable with creating your own crazy quilt design, use one from a book or free online site.
To help with the bulk of the various layers of fabric, I have left a bit larger seam than normal. Once the block is sewn, it is helpful to sew a basting line around the outer edge of the block. This helps keep the fabrics well in place when you come to sew the front over your matting board. Have fun with stitching on the block but stay within your lines of space marking the front view of the pinkeep.
For patchwork, simply sew the block, again being sure to leave a wider seam around the finished block than normal.
We are now ready to put the pinkeep together. This is done using the same method as with a stitched pinkeep and my tutorial can be found here .
Monday, January 14, 2008
A year older.....
.....and a year wiser??? Well that is an answer only the birthday girl can give. Today is my little niece's (who is not so little somehow) birthday. I won't reveal her age cause she is a big girl and I might get birthday smacks if I do. LOL! But then again, she is very far away and would have to have very long arms.....nah.....I won't risk it!
I wish you a very happy birthday Mandie! Did you hang the birthday pennants for today?
Please stop in and wish Mandie a happy birthday too. Her DH is away and she and Zoe are alone to celebrate.
Wednesday, January 09, 2008
A winter scarf ornament tutorial
I just posted this winter tree that I made this year for the month of January on my blog CelebrateTheSeasons. Since it is needlework and I always post my tutorials on this blog, I decided to have this tree on both blogs. These ornaments are so simple and great fun to make so here in the scarf ornament. To make the mittens, see the information on the other blog. These were also an online tutorial and are just adorable.
Don't forget you can click on the photos to enlarge them for detail.
Use quilt batting that is knobbly (is that a word?). I used Hobbs 80/20 as that is what I use for my quilts. Warm and Natural would also work well. Cut the batting in strips of 1 inch x 15 inches.
Cut fringing on each end.
Fold the scarf over as shown and use a wide stitch to gather at the neck line.
Knot the end of the gather to secure this well.
Age the ornaments by using cold coffee which you splash on the batting with your fingertips. This can be skipped if you would rather the ornaments be white. You can age them as much or little as you desire.
The next step is to add glitter and snow. Dribble glue here and there over the ornaments. I used the loose snow you can purchase to use with Christmas villages. I simply added a little glitter to it while I sprinkled the snow over the ornaments.
To further decorate the scarf, I used a brown and cream checked ribbon and vintage bobbin lace with a pretty button.
Simply tie the two ribbons, at the same time, around the gathered bit of the neck.
Add a bit of perle cotton on the back to hang the ornament.
Sew a pretty button just under the ribbon for extra decoration.
I hope you enjoy this very simple ornament. It could not be easier to make and would even be a fun project to do with children.
Celebrate winter! Go to CelebrateTheSeasons for more photos of the winter tree.
Monday, January 07, 2008
Turning life into a quilt...
This year our quilt group's new theme is a medallion quilt. I start our theme each year in January. On Wednesday evening, we get together and they will receive their first assignment to start their quilt. It is going to be an exciting year. I give them instructions for each section of the medallion quilt but they have to fill in not only the colors and fabrics they wish to use but also the quilt pattern. Even though everyone will follow the same sizes, each medallion quilt will become a very personal thing.
These are the fabrics that I am using for my quilt. I have no idea if I will use them all but they will all remain in my basket for this year while I construct my own quilt. This is a Moda fabrics line called Calico Craze and I was drawn to it not only by the wonderful shades but also it being a historical reproduction line. I had purchased these fabrcis with the idea of saving it for a special project and this year's theme was just right.
Their first assignment is to create the center for the medallion quilt. It is going to represent themselves. They will pick colors that they feel passionate about and a block that they feel will tell something about themselves. Explaining my own choice will help you understand how this quilt is going to be built up in the various layers.
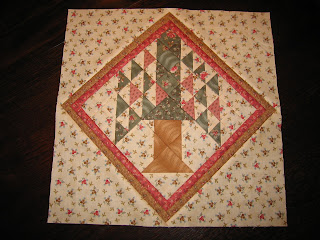
For me, I choose the Tree of Paradise. I wanted a tree and choose an old pattern as I love history and this block has its roots in quilt history. I love trees and feel they give energy. I also saw the tree as a symbol for the fact that I have been rooted in what I like in life since I was young but even though I grow strong, I also bend with the winds as life goes on.
Don't forget that by clicking the photos, you can see them in much more detail.
These are the fabrics that I am using for my quilt. I have no idea if I will use them all but they will all remain in my basket for this year while I construct my own quilt. This is a Moda fabrics line called Calico Craze and I was drawn to it not only by the wonderful shades but also it being a historical reproduction line. I had purchased these fabrcis with the idea of saving it for a special project and this year's theme was just right.
Their first assignment is to create the center for the medallion quilt. It is going to represent themselves. They will pick colors that they feel passionate about and a block that they feel will tell something about themselves. Explaining my own choice will help you understand how this quilt is going to be built up in the various layers.
For me, I choose the Tree of Paradise. I wanted a tree and choose an old pattern as I love history and this block has its roots in quilt history. I love trees and feel they give energy. I also saw the tree as a symbol for the fact that I have been rooted in what I like in life since I was young but even though I grow strong, I also bend with the winds as life goes on.
Don't forget that by clicking the photos, you can see them in much more detail.
Thursday, January 03, 2008
More Christmas presents have arrived.....
.....and I can share some photos. This first series of photos is of a quilt I sent to my niece Mandie for Christmas. It is one I made about 14 years ago and I am letting my nieces inherit some of my handwork and this was Mandie's first piece.
This Midnight Star is made with the Lone Star pattern and is a wallhanging. I wanted it to look more like a starburst so I used three blue fabrics.
This quilt was one that I enjoyed doing a lot of hand quilting on.
Click any of the photos to enlarge them.
The second gift was for my little grand niece Zoe. I made her a wool felt purse in her favorite color pink. I loved making this one and especially the little stitched bumble bee!
Susan ~ A WIP roll is used to hold stitching as you finish or work on things. It is to keep them clean and unwrinkled.
Angela ~ I am pleased that William Morris would approve as he is my hero.
Subscribe to:
Posts (Atom)